· Katherine · Blog · 7 min read
Labubu Drawing Guide How to Draw a Labubu Doll
Learn how to draw a Labubu doll step by step! This easy Labubu drawing tutorial covers sketching. Start creating your cute Labubu sketch now!
Labubu has become a global favorite in recent years, loved for its unique blend of creepy and cute. From social media to designer toy stores, its image appears everywhere. Whether you’re an art hobbyist or a beginner, this guide will show you how to draw your own Labubu step by step—from understanding its features to finishing with color, and even how to generate Labubu-style images with AI.
Part 1. Understanding Labubu’s Key Features
Before putting pencil to paper, it helps to understand what gives Labubu its recognizable charm. These features are key to capturing its character accurately in your drawing.
- Large head with exaggerated proportions: This makes Labubu look more toy-like and whimsical.
- Wide, round eyes: Often positioned high and spaced apart, with highlights to create a sense of innocence and curiosity.
- Zigzag smile with visible teeth: Labubu’s mischievous grin is one of its most iconic traits.
- Pointy ears: Located on the top sides of the head, usually rounded with fluffy outlines.
- Fur-like texture: Often shown with zigzag or wavy lines to simulate fluffiness.
- Short limbs with stubby fingers and toes: These add to its toy-like, plush appearance.
- Simple yet dynamic body: The body is basic in shape but can be posed in many playful or dramatic ways.
By keeping these traits in mind, your drawing will better reflect the authentic Labubu look.
Part 2. Materials and Tools You’ll Need
The right tools can make drawing smoother and more enjoyable. You don’t need expensive supplies—just a few quality basics will do the job.
- Pencil: Choose an HB or 2B for sketching outlines, and a softer pencil like 4B for shading.
- Eraser: A kneaded eraser helps lift lines without damaging the paper. A precision eraser is useful for cleaning up details.
- Sketch paper: Use medium-to-heavyweight paper that handles erasing and layering well.
- Fine-tip pen or liner: Ideal for inking your outlines clearly once your sketch is complete.
- Colored pencils or markers: Warm tones like tan, peach, and light brown work well for Labubu’s body. Use dark brown or black for the eyes and outlines.
- Blending tools: Optional, but blending stumps or cotton swabs help with smooth shading.
- Tablet and stylus (optional): If drawing digitally, use any app that allows layering and pressure-sensitive brushes.
Part 3. Step-by-Step Guide to Drawing Labubu
This step-by-step guide breaks the drawing process into manageable parts. Take your time with each stage, and don’t worry about being perfect—Labubu’s slightly uneven and fluffy look actually benefits from looseness.
Step 1. Sketch the Head and Ears
Begin your drawing by focusing on Labubu’s most iconic feature, its oversized head with pointy ears. This part sets the foundation for the rest of the body, so take your time to get the shape and proportions right.
Start with a large, rounded oval that takes up more than half of your drawing area. This exaggerated size gives Labubu its signature toy-like appearance. Around the top and sides of the head, add zigzag or wavy lines to simulate soft fur. Don’t worry if the shape isn’t perfectly even. A bit of asymmetry can make the character look more natural and expressive.
At the top of the head, place one ear on each side. Draw them as tall, upside-down U shapes, gently curved outward. Inside each ear, sketch a smaller inner curve for added depth. You can outline the ear edges with broken or jagged lines to keep that fluffy, slightly messy texture that makes Labubu so endearing.
Tip: Keep the ears balanced but not exactly the same. Small variations in shape can add personality and help bring out Labubu’s quirky charm.
Step 2. Add Eyes and Facial Features
Draw two large eyes, spaced slightly apart near the upper-middle part of the head. Inside each eye, add:
- One large pupil
- A small circle or oval highlight for shine
- Optional: A tiny second highlight to enhance cuteness
Between the eyes, draw a small rounded triangle or simple arc for the nose. Just below the nose, sketch a wide open mouth using a curved zigzag line. Add 3–5 visible teeth on each side.
Tip: Don’t over-detail the face. Simplicity adds to the playful feel.
Step 3. Draw the Body, Arms, and Legs
After completing the face, it’s time to shape the rest of Labubu’s plush figure. This stage focuses on building the body and limbs with soft, rounded lines and fluffy edges to match its toy-like appearance.
Start by drawing a wide U shape beneath the head for the torso. Keep the lines slightly wavy or zigzagged to give a furry texture. From each shoulder, extend short arms diagonally outward. Sketch them with light zigzags to maintain the fluffy feel. At the ends of the arms, draw simple hands—each with a thumb and three stubby fingers. You can make the fingers pointed or round, depending on your style.
Next, move to the legs. Draw two short, slightly curved lines downward from the base of the body. End each leg with three small toes or claw-like shapes using zigzag strokes. For added detail, include a soft belly curve or a line fold at the center of the torso.
Note: Keep all limbs proportionally short—arms and legs should stay smaller than the head and torso to preserve Labubu’s chibi charm.
Step 4: Finalize with Outlining and Color
After finishing your sketch, it’s time to bring your Labubu to life with clean lines and color. This step adds clarity and personality, turning your rough draft into a complete illustration.
Use a fine-tip pen or digital brush to carefully trace over your final lines. Keep your hand steady and follow the curves closely to preserve the soft, plush feeling of the character. Once you finish outlining, gently erase all remaining pencil marks. This will help your drawing look clean and polished. Take a moment to check the balance of the features, especially the eyes, nose, and smile. Small adjustments here can make a big difference in the overall expression.
Now move on to coloring. Choose soft tones like light brown, peach, or dusty pink to fill in the body. Use darker shades to add depth around the mouth, inside the ears, and under the arms. For highlights, brighten the top of the head, cheeks, or hands to make the figure pop and feel more three-dimensional.
You can also add a soft shadow below the character to give it grounding on the page. Whether using colored pencils or digital tools, layer your colors slowly and blend gently to keep Labubu looking warm and cuddly. 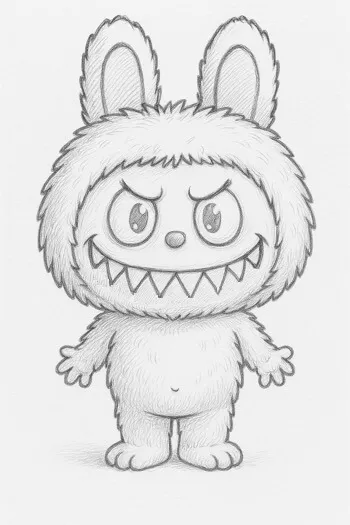
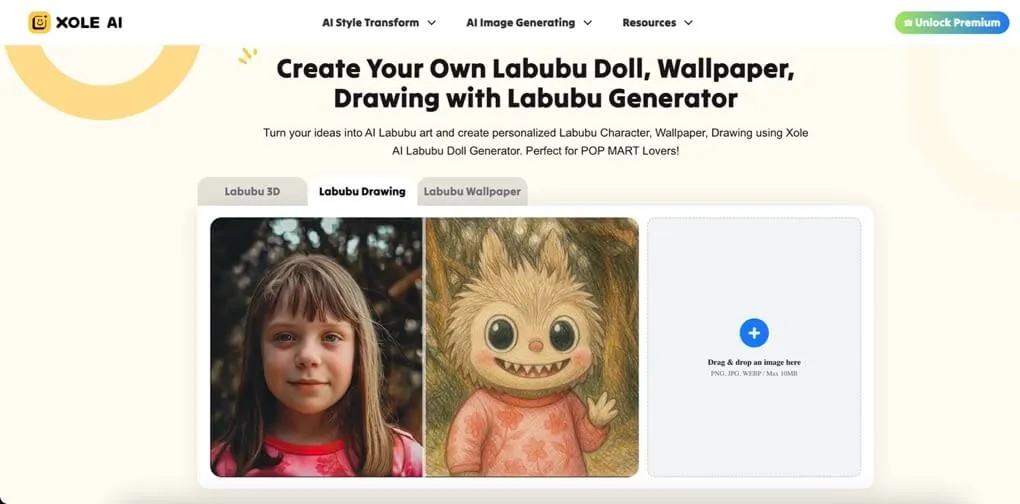
Bonus: Instantly Generate Labubu-Style Images
If you want to see what your own photo would look like in Labubu’s fluffy style, you can skip the drawing and try an AI-powered tool. Xole AI Labubu Drawing Generator lets you upload any image and instantly turn it into a Labubu-style artwork. It’s great for creating fun profile pictures or trying new ideas without starting from scratch. Just choose your photo, hit generate, and enjoy the result in seconds.
Final Thoughts
Drawing Labubu is a fun way to practice character design and express creativity. From its giant eyes to furry limbs, every detail brings joy to the process. With the right tools and steps, anyone can create a version of this charming figure.
Whether you follow this guide by hand or use digital methods, don’t be afraid to experiment. You can personalize Labubu with outfits, poses, and expressions. And if you prefer a quick approach, the Xole AI tool is always there to help. Most importantly—enjoy the process and have fun!